If you’ve ever been stuck with a dead car battery, you know how frustrating it can be. I’ve been there myself, staring at a car that won’t start and wishing I had a simple way to check the battery.
The good news is, you don’t have to be a mechanic to test a car battery. All you need is a basic multimeter and a few simple steps. I’m going to show you how to check your battery at home, quickly and safely.
Testing a car battery at home is easier than most people think. You can figure out if your battery is healthy or if it needs replacement.
Plus, it helps you avoid roadside surprises. Let’s explore this step by step.
Why You Should Test Your Car Battery
Your car battery is the heart of your vehicle’s electrical system. It powers the starter, lights, radio, and other electronics. Over time, batteries lose their ability to hold a charge. Testing your battery at home helps you catch problems early.
A simple car battery voltage test can save you time, money, and stress. It tells you if your battery is fully charged, weak, or dying. Plus, it’s a useful skill to have if you like doing DIY car maintenance.
What You Need for a DIY Car Battery Test
A digital multimeter (cheap and widely available)
Gloves and safety glasses for protection
A clean, dry surface to place your battery
A multimeter is a simple tool that measures voltage. It will help you check your battery’s charge and health. If you’ve never used one before, don’t worry—I’ll guide you through every step.
Step 1: Set Up Your Multimeter
Start by turning on your multimeter. Set it to DC voltage (V with a straight line) and make sure it can measure at least 20 volts. Most car batteries are 12 volts, so a 20V setting works perfectly.
Your multimeter has two probes: red (positive) and black (negative). You’ll touch these probes to the battery terminals to read the voltage. Keep your hands steady and follow safety precautions.
Step 2: Locate the Battery Terminals
Open your car hood and find the battery. Usually, it’s near the front of the engine bay. The battery has two terminals:
Positive (+) usually red
Negative (-) usually black
Make sure the terminals are clean. If they have dirt or corrosion, wipe them gently. Dirty terminals can give false readings.
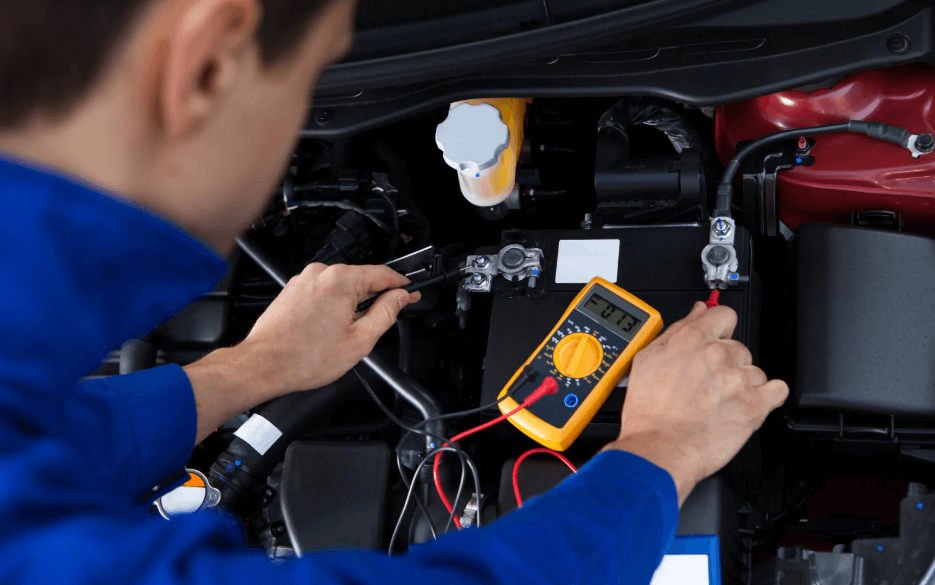
Step 3: Test the Battery Voltage
Now comes the fun part. Place the red probe on the positive terminal and the black probe on the negative terminal. Look at the multimeter reading.
Here’s what the numbers mean:
-
12.6 volts or higher – Battery is fully charged
-
12.4–12.6 volts – Battery is partially charged
-
12.0–12.4 volts – Battery is weak, needs charging
-
Below 12.0 volts – Battery is likely dead or failing
This simple battery voltage reading tells you a lot about your car battery’s health.
Step 4: Perform a Battery Load Test (Optional)
A voltage test alone doesn’t tell the whole story. A battery might look good at rest but fail under load. You can simulate this by turning on your headlights or blower fan while testing. If the voltage drops significantly, your battery may be weak.
This is a quick DIY battery load test you can do at home without special equipment.
Step 5: Check for Signs of a Dead Car Battery
Even without a multimeter, some signs indicate a weak battery. Look for these:
-
Slow engine crank
-
Dim headlights
-
Corrosion on battery terminals
-
Electrical components acting strangely
If you notice any of these signs, it’s a good idea to do a full multimeter battery test.
Step 6: Safety Tips While Testing
Working with car batteries is safe if you follow a few rules:
-
Always wear gloves and glasses
-
Avoid touching both terminals at the same time
-
Keep metal objects away from the battery
-
Work in a well-ventilated area
These precautions protect you from sparks, acid, or accidental short circuits.
Step 7: Maintain Your Battery for Longevity
Testing is just one part of keeping your battery healthy. You can also:
-
Keep terminals clean
-
Ensure battery is secured in place
-
Avoid leaving lights or electronics on when the engine is off
-
Charge the battery regularly if the car isn’t used often
A little maintenance goes a long way in extending battery life.
Step 8: When to Replace Your Battery
Even with good maintenance, batteries don’t last forever. Most car batteries last 3–5 years. Test your battery regularly. If it consistently reads low voltage, fails a load test, or shows physical signs of damage, it’s time for a replacement.
Replacing a weak battery is cheaper and safer than getting stranded on the road.
FAQ
Q: Can I test my car battery without removing it?
Yes. You can test your battery in the car using a multimeter. Just make sure the car is off and the probes touch the correct terminals.
Q: What is a normal voltage for a car battery?
A fully charged 12V battery should read around 12.6 volts. Anything below 12.4 volts means it may need charging.
Q: How often should I check my car battery?
Check your battery every 3–6 months or before long trips. Regular checks prevent surprises.
Q: Can a battery test fail even if voltage is normal?
Yes. Some batteries hold voltage at rest but fail under load. Performing a load test helps catch this issue.
Q: Can a multimeter tell if my battery is dying?
Yes. A multimeter shows voltage and helps identify weak or failing batteries. Low voltage readings or drops under load indicate a problem.